1. Select a report from the list in the Navigation pane.
2. The Parameters tab will open by default. Each report has a unique set of one or more parameters that can be specified before running your report. As in all other Perspective forms, red parameter fields are required and all others are optional.
· Select a Language: Choose a label set or a language of your report (e.g., System English).
· Select Group By: Choose the entity your report’s results will be grouped or organized by (e.g., Access Level, Role, Workgroups, Status, Class Rollup).
· Select a Date Range: Set a date range(s) your report’s data will be drawn from. Some reports may provide an option of selecting more than one date range for comparison.
· Year/Quarter/Month (for the Frequency Distribution Report): Select the time period for which you would like your report to display statistics.
· Workgroups checkboxes: Select the workgroups you would like the report to generate statistics from. Check All Workgroups to select all workgroups in the list.
· Select a Business Type, Class Type, Lookup Type, Org Type, or Site Type: Specify the particular lookup list or rollup for which you would like to view available options or values.
· Select an Officer (only for Officer reports): Choose the officer for which you would like to see the report data.
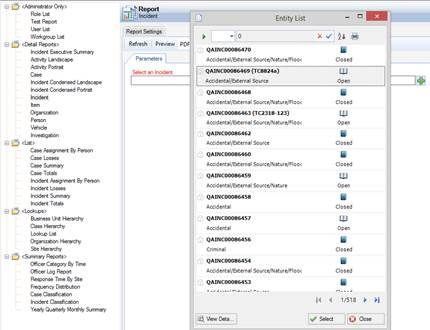
· Select an Activity, Incident, Case, Item, Organization, Person, or Vehicle: Indicate the particular entity your report will be based on (e.g., Incident record INC-2010-000124, Jane Doe’s Person record).
· Select Series (only for Totals reports): Specify the entity that your report’s charts will be grouped or organized by, next to the selected Group By field (i.e., Status, Disposition, Access Level, or Workgroups).
· Select Net Loss Over/Under (only for the Yearly / Quarterly / Monthly Report): Specify the Net Loss threshold value by which you would like to organize your report.
· Completed? (only for Assignment reports): Indicate whether you would like completed, incomplete, or both completed and incomplete assignments to be included in your report.
· Include Locked? (only for the Role List report): Indicate whether or not you would like locked roles to be included in your report.
3. In addition to the Parameters tab, some Summary Reports have an option of filtering data that you would like to include in your report. To further qualify your report results, select the Criteria tab.
a. Check the All Workgroups for Lookups and Rollups box to search across lookup lists and rollup values for all workgroups.
b. In the Searchable Fields pane, select a form entity to display its available fields in the yellow pane to the right.
c. Highlight and right-click a field you would like to specify settings for, and select Search By to add the field to your search criteria. The chosen field will automatically populate the Field Name box in the search pane on the right half of the screen.
d. Select a field operator from the Opt lookup list (e.g., =, >).
e. Enter the comparative value in the Value field or select an option from the list by clicking on the plus icon  .
.
f. Click Enter to add the field specification to your report search criteria.
Every time you add a new field specification to the search criteria, the pane on the left will populate with a new symbol associated with the added criterion (e.g., A, B, C). The arrangement of the symbols in the pane defines the relationships between the criteria, which are also reflected in the Boolean logic statement outlined below. By default, every criterion added is in the OR relationship with the previous and next.
g. To modify these relationships (and the logic statement), creating an internal hierarchy within the criteria, select a symbol from the pane on the left and click the adjacent up or down arrows. Criteria that appear in separate nodes are in the OR relationship to each other, while criteria that appear in sub-nodes are in the AND relationship to the main criterion at the top of the node.
h. To modify your search criteria, select the criteria you want to modify, make changes in the Opt and Value fields, and click Update. The changes will be applied to the criterion on both the level of the criteria list and the Boolean logic statement.
i. To remove a field from your search criteria list, select the field and click Remove.
4. Click Preview in the Report Settings toolbar to generate the report.
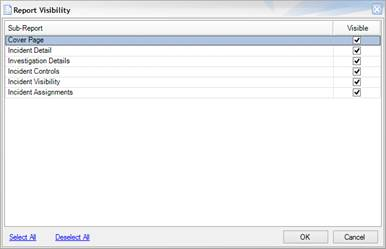
5. For some reports, you will have to select parts of the report that you want to include in the report from the Report Visibility window. This window contains checkboxes for all report sections containing data. By default, all boxes will be checked. Uncheck the boxes for any sections you do not want to appear in your report. Check the Download All Attachments? box if you want to download the attachments included in the record for printing (this checkbox only appears if the report includes attachments). Click OK.
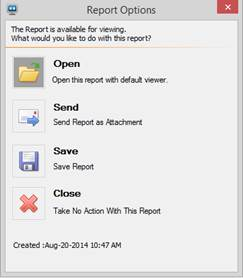
6. A Report Options window will open.
a. Click the Open icon to instantly view a printable PDF copy of the report.
b. Click the Send icon to send an email message with a PDF copy of the report attached.
c. Click the Save icon to save a PDF copy of the report to the location of your choice.
d. Click the Close icon to cancel the report.
7. To access the most recently generated report, click the Open Local button in the Report Settings toolbar.
Note: The Preview button should always be used to generate new reports with the most up-to-date data available in Perspective. The Open Local button should only be used to quickly reference recently run reports.