Pick list fields can be populated with values linked from the common database. There are two ways to link a pick list field to a value from the database.
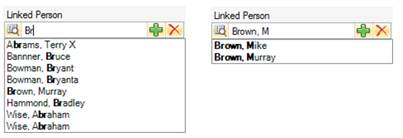
First, you may start typing an approximate value directly in the pick list field to display a list of records showing only those values that contain the letter(s) that you have typed.
Note: This option is not available if you are selecting an Investigator.
Second, you may select the data entry from the appropriate Entity List that opens when you click the Add icon to the right of the field.
Note: Some Person pick lists only allow persons designated as Perspective users, or Perspective users with specific privileges (e.g., Investigators) to be selected. In these pick lists, all persons available for selection will automatically be displayed in the window, and there will be no option to change the view.
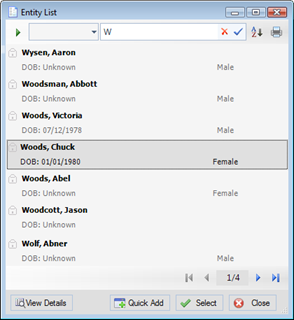
· If you have a default view specified for the data entity, this view will be displayed in the pick list. If not, the window will be blank. You may select or change the view by choosing a preset view from the Entity List lookup. To reset the view to display all records, click the green arrow icon .
· To find a specific user in the list, start typing the name in the search field to automatically filter the user list by the letter(s) that you have typed. To apply the filter, click the checkmark icon . To remove the filter, click the clear icon and then the checkmark icon to view the original list.
· To arrange the list alphabetically, click the A to Z icon .
· To print the list, click the Print icon .
· To quickly view a particular entity’s record, select the entity in the pick list and click the View Details button located at the bottom of the dialog box. The record will open in read-only mode in a separate window. Close the window to return to the pick list.
Note: If you do not have permission to view a particular entity’s record, the View Details button will be grayed out when you select the entity.
· Once you have found the correct entity, double-click it, or select it in the pick list and click the Select button . The pick list window will close and the field will populate with your selection.
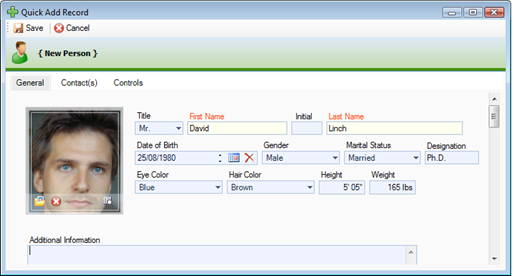
· Alternatively, if the entity you are looking for does not have an existing record, you may use the pick list’s Quick Add function to create one. Click the Quick Add button , and a blank data form will open in a separate window. Enter all known information, ensuring that all required fields (marked red) have been populated, and click Save when you are finished. The Quick Add form and the pick list window will close, and the field will populate with your entry. You can further edit your entity from there.
Note: The Quick Add function is only available in Item, Person, Organization, and Vehicle pick lists. Further, some Person pick lists only allow persons designated as Perspective users, or Perspective users with specific privileges, to be selected; these pick lists do not offer the Quick Add function.
After populating a pick list field with a selected entity, you may click the View Details icon to the left of the field to quickly view the entity’s record. The entity’s record will open in read-only mode in a separate window. If you are not authorized to view the entity’s record details, you will receive a message indicating this, and the record will not open.
At any time, you may click the Remove button located next to the Add button to clear the field of the current selection.