There are various properties and functions which you can use to influence the layout of a table.
Align Columns
There are various ways of simplifying the use of table objects.
· If you hold down the CTRL key when reducing the size of a table, all columns will be automatically reduced in size by the same factor.
· The width of the columns adjusts automatically. You can adjust the width of a column manually by moving the separating line to the right or the left with the mouse. This changes all table columns, whose separators are within +/-2 mm from the mouse position. If you hold down the CTRL key, the action will only be carried out for the line on which the mouse is positioned. If the Column width modification affects next column option is enabled (File > Options > Workspace), you can alter the column width while making the next column smaller.
· If you move the first column separator to the right with the mouse, an empty column will be created in all line definitions.
· Use the function TableWidth() to define the column widths relatively. It returns the width of the table object. Example: With TableWidth()*30/100 the Column takes 30% of the width.
· You can hide Line Types (header, data, footer, group lines) in the workspace. To do this, select the table object and use Visible Line Types in the context menu or the corresponding menu item View> Visible Line Types.
· To align (sub) tables easier with one another, additional tick marks can be shown on the ruler by means of an element property.
Fixed Size
The Fixed Size property lets you specify that the size of the table is not to be adjusted automatically when fewer data lines are printed than the available space in the table object.
This property is useful to ensure that footers are always printed at the bottom of the page, e.g., if the page number is output in the footer. If the property is disabled, the end of the table automatically moves upwards (and the footer therefore also).
Print Header Lines and Footer Lines Again
If the print of a table is continued on the following page, the header lines of this table and the outer table will be printed again. To suppress repeated printing of the header lines on the following page, use the FirstHeaderThisTable() function as an appearance condition.
This functionality is also available for footer lines, here you use the LastFooterThisTable() function as the appearance condition. This ensures that footer lines are only output on the last page of the table in the event that the print is continued on the following page due to lack of space.
Define the Size of the Table Variably
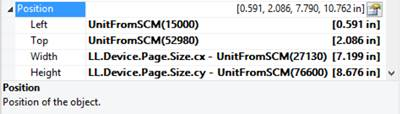
You can define the height and width of the report containers variably to avoid data being truncated when the page format is changed (e.g., from portrait to landscape).
To do this, select the report container in the Report Structure tool window and use the LL.Device.Page variables and the UnitFromSCM() function to specify the height and width.
Force a New Page
With complex projects containing hierarchical tables, it is sometimes wise to create a page break before outputting a line of the top table.
Alternatively, you may want to have a new page if, after outputting a data line of the top table, there is not enough room for the following data lines of the sub-table.
You can handle both cases with the Pagebreak Condition property.
For example, in the case of a hierarchical table, in order to output each data line of the main table on a new page, select the main table in the Report Structure tool window and set the Pagebreak Condition property to True.
Create a Conditional Page Break
Let’s assume that you want to create a continuous table. However, you want to avoid printing data lines from the main table at the bottom of the table unless there is enough room for at least 3 data lines from the sub-table.
You do not want it to look like this:
You can avoid this by means of the RemainingTableSpace() function. This function returns a value showing the available space. If you set the parameter to True, the value will be returned as 1/1000 mm.
If you want to specify that a new page should be started before outputting the data line of the main table if the space remaining is less than 3 cm, enter the following formula for the Pagebreak Condition property:
RemainingTableSpace(True)<30000
Keep Lines Together
If the print of a table is continued on the following page due to lack of space, you can decide whether the lines are to be separated or kept together if possible.
This option is useful for multi-line data lines or for invoice footer lines containing totals. You can use this option with data lines, footer lines, group footers and group headers.
Output Free Content Before and After a Table
You can output free text before and after a table. To do this, use the RTF object and link the object to the project as free text via the report container.
1. To add a new element to the report container, select the Append an element or the Append a sub-element button in the Report Structure tool window.
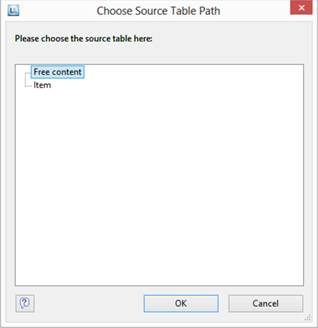
2. A selection dialog will appear for the chosen object type. Choose the Table object type.
3. In the following dialog, select Free content as the data source.
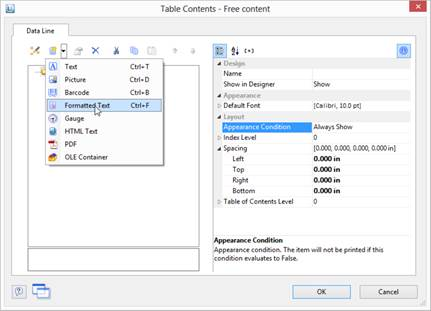
4. Then add a column via the properties dialog for the table object. In our case, we want to create the covering letter as formatted text. Therefore, click the small arrow on the right of the button and choose the Formatted Text option.
5. A dialog appears where you can type in the covering letter in the form of continuous text. You will find detailed instructions for working with formatted text in Chapter Practice: Create a Mail Merge Project.
6. Please don't forget to remove the (column) frame for free content. The best way is to remove the frame via the Default Frame property in the element properties.
8. You may also have to change the layer condition as the covering letter will now be output on the first page.
9. If the General Terms and Conditions are also to be output at the end of the invoice, you must add another free content object to the container after the item table. Then you have several options:
a. Use the Formatted Text object here as well.
b. Use the PDF object and include the General Terms and Conditions in PDF format.
c. Use the LoadFile$() function to load a linked file and enter the path of the file as the parameter as follows LoadFile$ (ProjectPath$()+\gtc.txt).
d. For the issue on a reverse side, see Reverse Side in Chapter Report Sections.
Anchored Lines (Overlapping Cells)
Let us assume that you want to output the contents of a column across two lines. You can achieve this by anchoring two lines to each other by the line property Anchor to row (Index (1-based) of the row; 0=no anchoring). So the beginning of the next line definition will be forced to the beginning or the end of another line definition. Hence the cells can overlap.
Note: This function is not supported by all export formats.
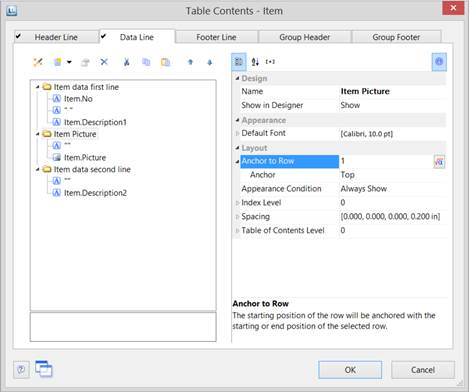
Let’s assume that you want to create two lines next to an image column:
1. Define in the first line with 3 columns: Item.No (column width 1), empty content, a space (column width 1), Item.Description (column width 3).
2. Define in the second line with 2 columns: empty content, Item.Picture (both column width 1). in the line properties set Anchor to Row to 1 to anchor this line with the first line definition.
3. Define the third line also with 2 columns: empty content (column width 2), Item.Description2 (column width 3).
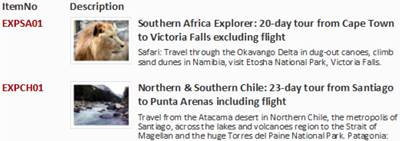
4. Thus, the second line is printed in the same starting position as the first line and the cells may overlap:
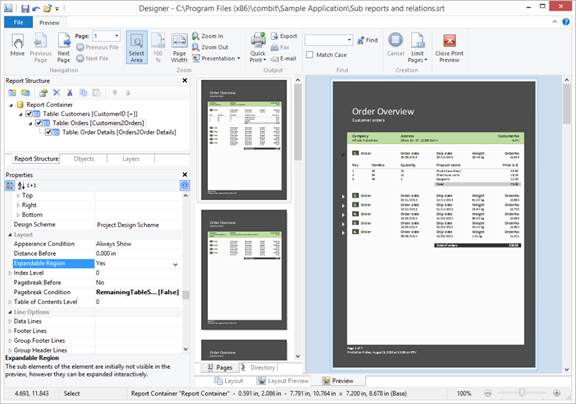
Expandable Region
When you activate the property Expandable Region, the sub-elements of an element are not printed into the preview at first during printing, and a drop-down symbol will be displayed on the line itself. Clicking on the symbol expands the region for the corresponding line, providing a drill-down option without having to leave the current preview, and without having to design a separate project.