Edit an Existing Record View
1. In the Navigation pane, choose the record entity you intend to work on (e.g., Incidents).
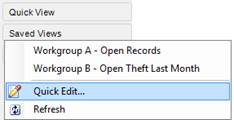
2. Expand the Saved Views menu.
3. Select Quick Edit. The Record Views window will open.
4. If you have not yet opened a saved record view and your Listing pane is blank, select an existing view you want to edit under the Saved Views menu.
· Its settings will be displayed. However, if your Listing pane displays a selected record view, the Record Views window will open with the active record view’s parameters displayed.
6. To save the view replacing the parameters previously set, click Save.
To save the modified record view as a new view, complete the Saved Views section, as follows:
a. Click Add. A pop-up will appear asking you if you want to clear the current view criteria.
b. Click No to save the criteria specified. If you click Yes, the view will be reset to its original settings.
c. Type a name for your edited view in the active Enter View Name field. This way, when you save your new view, it will not overwrite the original view.
d. Click Save. Your newly-created record view will now be available in the Saved Views menu.
If you do not want to save the modified view, proceed to the next step.
6. To return to the Data Forms window and transfer your record view to the Listing pane, click the Select button.
7. Click on a record in the Listing pane to display it in the Viewing pane.
· If you clicked on a particular record in the Record Views window prior to clicking Select, this record will be highlighted in the Listing pane and will already be opened in the Viewing pane.
 If you opened an existing view in the Listing pane, made changes to it, saved it, and then re-opened the modified view, you may need to click the Refresh button If you opened an existing view in the Listing pane, made changes to it, saved it, and then re-opened the modified view, you may need to click the Refresh button  in the Saved Views menu to refresh the view of your Listing pane with the new settings. in the Saved Views menu to refresh the view of your Listing pane with the new settings.
|
