Modify Fields and Columns
There are two possibilities for adding additional columns to tables or for editing and formatting them in detail.
Table Tools and Mini-toolbar
If you insert a table, the Table Tools and the tab Table are displayed. The tab contains the commands you need for working with table objects. When you have finished the work on the text object, the Table Tools are hidden.
Optionally, you can activate a mini-toolbar for the tabel-objects (File > Options > Workspace).
With the Table Tools you can define a new line, insert a new row, move selected rows/cells to the left/right, borders, apply fonts, font sizes, text colors and formatting as well as arrange objects.
· To select a field, click in the top left corner of the field. Hold CTRL or SHIFT to select multiple fields or a complete range.
· To select a complete line, click onto the bar on the left. Hold CTRL or SHIFT to select multiple paragraphs or a complete range.
· To select a complete column, hold ALT. Hold CTRL or SHIFT to select multiple columns or a complete range.
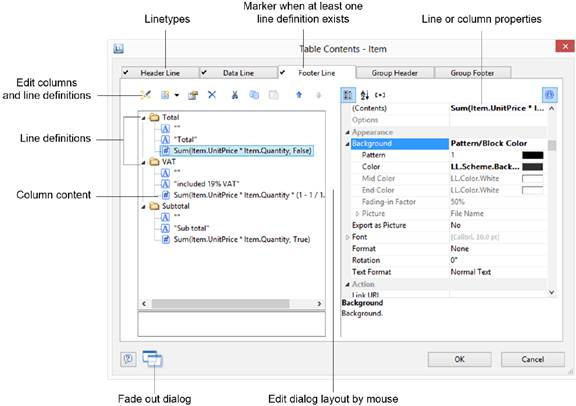
Object Dialog
Use the object dialog for more advanced functionalities. You open this dialog via the corresponding button in the mini-toolbar or by double-clicking the element in the report structure.
There is a tab for each type of line where you can specify the different definitions and columns for the respective line. The following types of line are available: header line, data line, footer line, group header, group footer. A checkmark on the tab indicates that a line type has one or more line definitions.
· Header lines are mostly used as titles for the columns of the table.
· Data lines contain the formatting for the actual table rows and the data that is to be shown in the table.
· Footer lines are displayed at the very end of the table and can hold final information about the data lines that are output above.
· Group header and footer lines are used to structure the data lines by means of Intermediate headings and Intermediate footers.
All line types can be defined independently of one another.
· This means that the columns of a header line can have a different appearance as the data lines or footers that follow.
· You can also create different line layouts or line definitions for the individual line types. It is then possible to activate the different line definitions with special appearance conditions as required.
Variables-/Field-List, and Drag and Drop
The Variables-/Field-List (Project > Variables/Fields) shows all available variables and fields of the current project. To add more columns to existing rows you can simply drag the desired fields from the list onto the corresponding position with the mouse (drag and drop). The field can be inserted to the left or right of the corresponding column, a symbol shows the insert position. The column (standard width 30mm) will be inserted in the corresponding row. Please note that columns could be created in the non-visible area.